Intune and PowerBI Deep Dive - Part 3 - Exploring Graph URLs

Next up, we’re going to explore the Graph and the URLs and permissions, in this post, continuing on from Part 1 and Part 2 , our next step is begin to firstly understand our path to getting Intune Data into PowerBI, which is going to be via direct Microsoft Graph calls - Remembering of course that the Intune Data warehouse did not meet our requirements. We are also going to leverage an application registration to access the data we want to see. This is gonna be a BIG post, so make sure you have plenty of time to read.
Quick Links
We’re going to explore the Microsoft Graph URLs, the structure of them, how to obtain what we need and some tools to test them to ensure we’ve got them correct.
Lets start with Graph versions. As you may or may not know, the graph is broken up into two versions.
For arguments sake you can think of these as Test (beta) and Production (v1.0) versions. In test, we have new additions, the urls may work perfectly but there may be limited documentation, or, they may have bugs that are not ironed out yet. I have lost an hour of my life trying to use a Graph URL from Beta, copied and pasted the url from the documentation and it didn’t work. After the hour, I discovered that changing one upper case “D” in the Graph URL to a lower case “d” made it work. This is the sort of crap you may have to deal with using Beta URLs. Dont let that put you off though, you’ll likely use Beta more that v1.0 to be honest but during your testing and building up of your own PowerBI queries, you might find you get the same results using v1.0 and if you do, use that where you can.

Microsoft Graph Explorer
OK, this is your first port of call if you’re new to Graph. Authenticate to this tool using your user account. Below I will orientate you through the console.
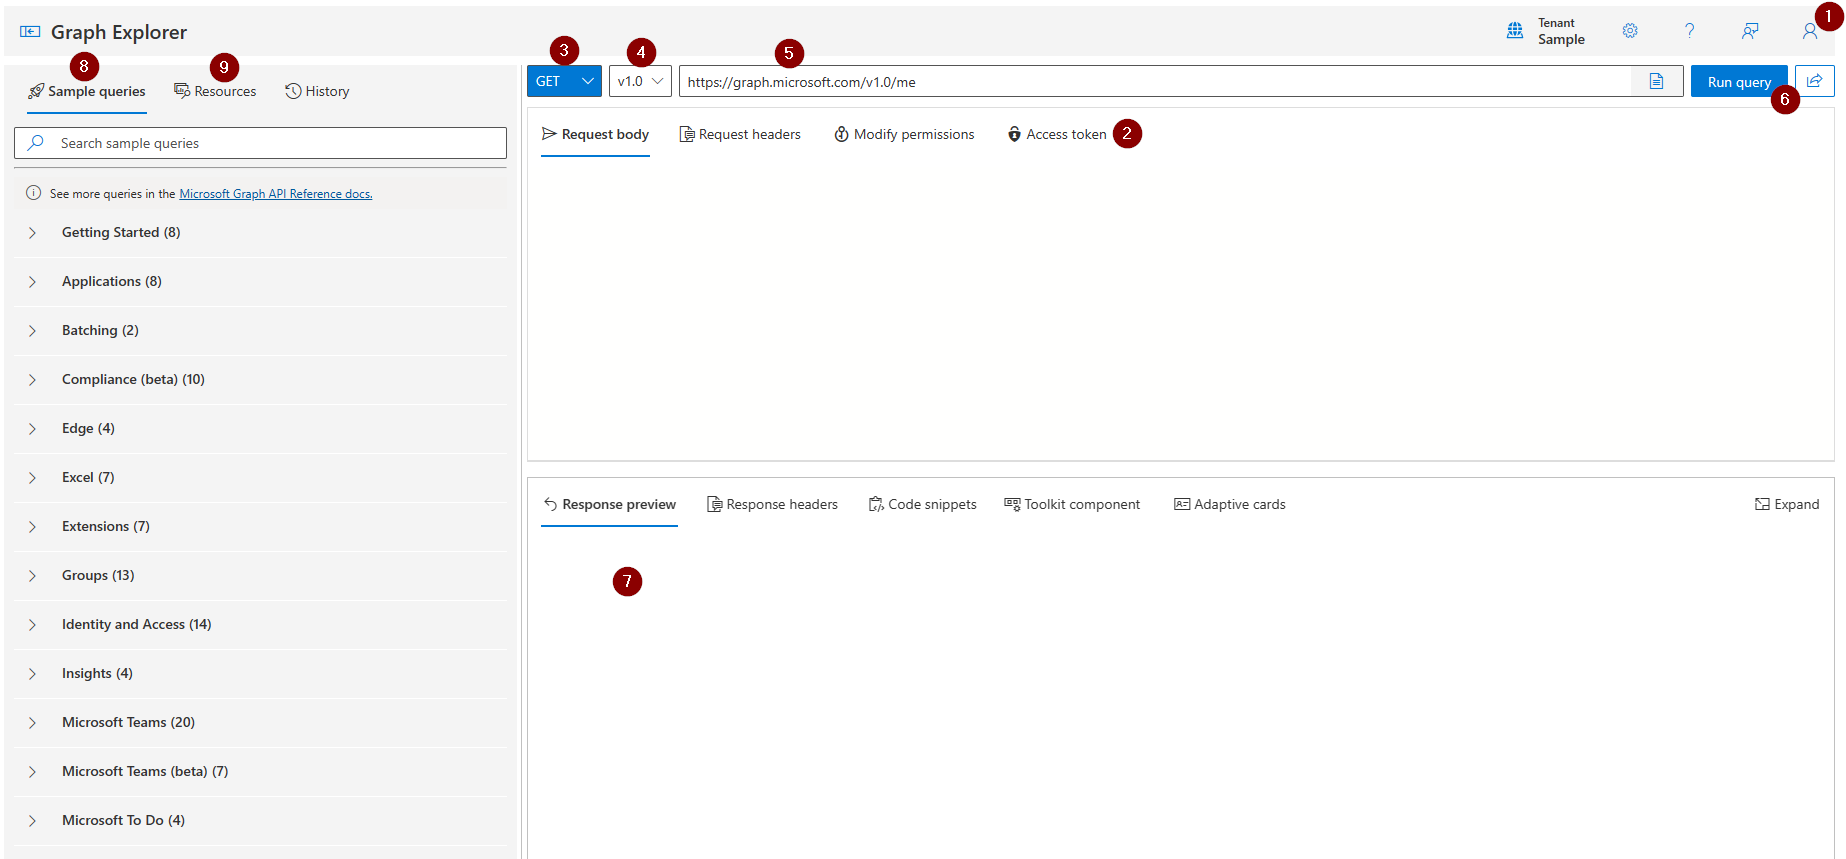
- This is where you sign in.
- Once signed in, your account wil be used to generate an access (Bearer) token that is used to authenticate againstMicrosoft Graph with, it can be seen here.
- This is the type of API call you are throwing to the Graph (GET, POST, PATCH, DELETE etc).
- This selects the version of the Graph you are going to use (v1.0 or Beta).
- This is the Graph URL you are going to pass.
- The Run Query button to execute the call.
- The results of the call will be shown here.
- There are some sample queries you can play around with to save you searching for your own until you become familiar with how to find out your own.
- These are the resources that are used withing the Graph call.
How are the Graph Calls Structured?
A graph call is made up of a few components, the endpoint, the version, the resource and the query parameters.
Like so: Endpoint/Version/resource/queryparameters…
Lets break this down for you:
- Using this url as the example : https://graph.microsoft.com /v1.0/users?$select=displayName,id
- https://graph.microsoft.com - This is the Endpoint
- /v1.0 - This is the Version
- /users - This is the Resource
- ?$select=displayName,id - These are the query parameters odata query parameters
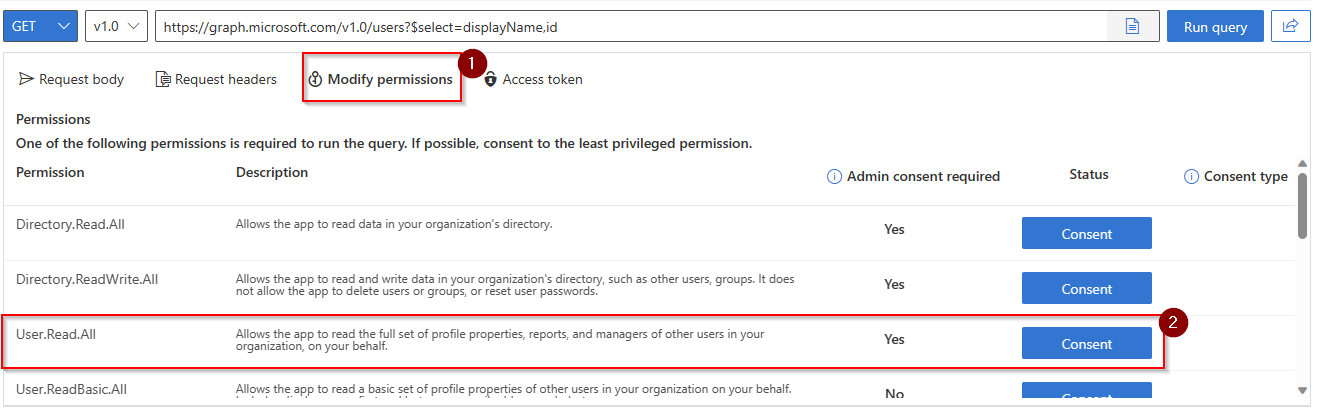
From the documentation for this Graph Call , here are the permissions it needs;

… now we’re not using application permissions here because the Graph explorer is authenticated against you, the user… but for the purposes of our PowerBI report we will be taking note of the application permissions, so you can see here this particular graph call requires User.Read.All permissions as a minimum for application permissions. The read permissions are normally sufficient for reading the data (or performing a GET API Call) should you wish to perform other tasks, such as PATCH (updating) POST (Usually Creating something) or DELETE (Self-explanatory) you may need higher permissions, such as *.ReadWrite.All.
Lets see what happens when we put this into Graph Explorer
Using the Graph URL from above….https://graph.microsoft.com /v1.0/users?$select=displayName,id.. when I run that in Graph Explorer I get back the following message (this will show in section (7) from the image above):

…If I then click on Modify Permissions… I can see that I am able to Grant User.Read.All, so I’m going to go ahead and select to Consent for that. Like so..
Once done I see a success message

If I then click on Run Query now that the permission has been granted I will now see results in my results pane!

Info
By now you should understand the four components of a Microsoft Graph URL. You should also understand how to obtain the correct permissions (Working on a lowest privilege best practice). At this point I would take a break, and go explore some graph calls and find the type of data you get back from those queries. Think about what you would like to see on a PowerBI report, what data is valuable to you, how that would be structured and which graph call can help. Next I’ll talk about Graph Xray, a tool to assist you.
Graph Xray
Next I want to show you Graph Xray . This Edge plug in will show you the graph calls required to get the information you’re looking at. So, once its installed and loaded, you can browse around the Intune console and see the graph calls you need. Thereafter you can decipher the resource required and start investigating the documentation for the call to build up the information you need to build your report.
Honestly, this tool is great.
- Install the plug in.
- Switch it on.
- On a website (such ad the Intune Console), press F12 to switch on Microsoft Edge Dev Tools.
- You may need to click on the » arrows on the top menu to see Graph Xray.
- Once displayed, your friends are ‘Clear Session’ before you click on something and then just look at the results.
- In the below example, I first cleared the session and then clicked on users within the Intune console.

This lines up with what I see in Intune. Its a users resource with some query parameters to show the properties I see in the Intune console. I can, of course, remove the query parameters to show the full results, rather than using the ‘select’ query to pick out certain fields too. If I was using this query to pull data into PowerBI, I would pull in the full query to get all the data, and I would be able to manipulate that data right in PowerBI desktop. It is safe to say though, that if you omit what you dont need, you’ll save processing time. From my own experience in the majority of small to medium sized businesses, this isnt worth worrying about. For large scale businesses, it absolutely is a consideration.
There is plenty of documentation surrounding Graph Xray, I’m not going to go into great detail here as there are other, more informative posts on the subject but I highly recommend you have this in your arsenal of Microsoft Graph tools. You can use this tool to explore around the Intune or Azure portal, for example, and collect up a list of Microsoft Graph resources and their relevant permissions so you can start to ‘story-board’ or think about how you want to build up your PowerBI dashboard. Very very useful indeed.
PostMan
Finally in this blog post we are going to discuss PostMan . An API tool that will be very handy to you on your Microsoft Graph journey.
Postman, can assist you in undertaking any API calls, not just the Microsoft Graph API, its a vast and complicated program far out of the scope of this blog post to explain, however I am going to show you how to set this up to work with the application registration you should have set up in Part 2 . From that post, you should have three key points of Information: The TenantID, the ClientID of the app registration, hereafter referred to as the AppID, and finally the SecretID which is the value portion of the secret you set up and is only valid for the period of time you configured when creating the secret.
OK, do what you have to do to register for an account and download the program, this process changes from time to time so visit the website and see what the deal is. Once you have it installed locally on your device, lets set this up to use that Application registration. It works as a cloud app, so set up an account and things you configure will sync and follow you around if you install on another machine and log in, boom all your API work will be there waiting for you.
Environments
Postman has this concept of “environments” where you can set up some common parameters for the environment you wish to access. In our case we want to access the Microsoft Graph Environment of our Intune Tenant (in order to build a PowerBI report from the Data) and we’re going to do that via the app reg. So lets go ahead and set up an environment with those details.
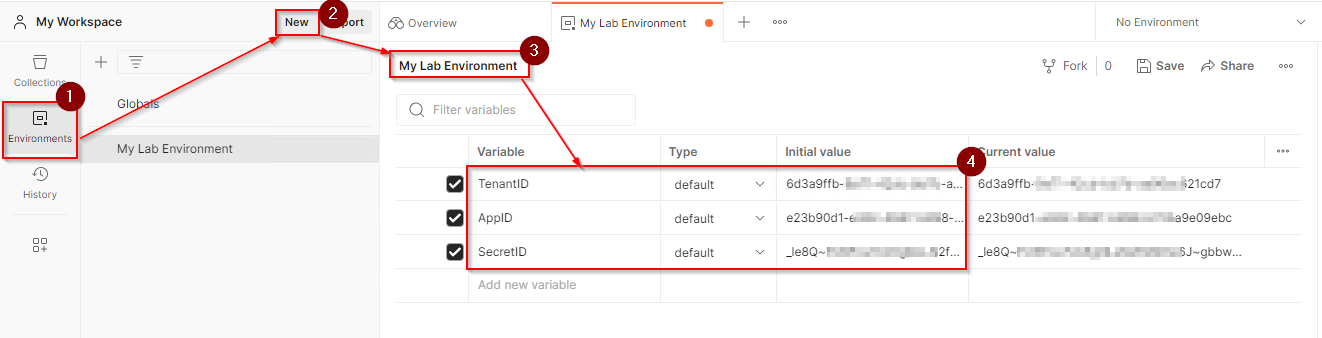
- From the left hand side menu, click on Environments.
- Click New (you may be asked what you want to create, if asked select Environments).
- Give it a Name
- Configure three variables for the environment, TenantID, AppID and Secret ID, paste the known values into the “Intitial Value” field. The reason we set the initial value is because these values are synced to the Postman servers, so if you log into Postman on another device, you’ll have your variables all ready and waiting for you. Cool huh?
Now you have you environment set up we can leverage these variable at any point so lets do that in the next step.
Collections
We’re going to create a Collection of Graph calls to use and group them, so, from the left hand menu follow this procedure:
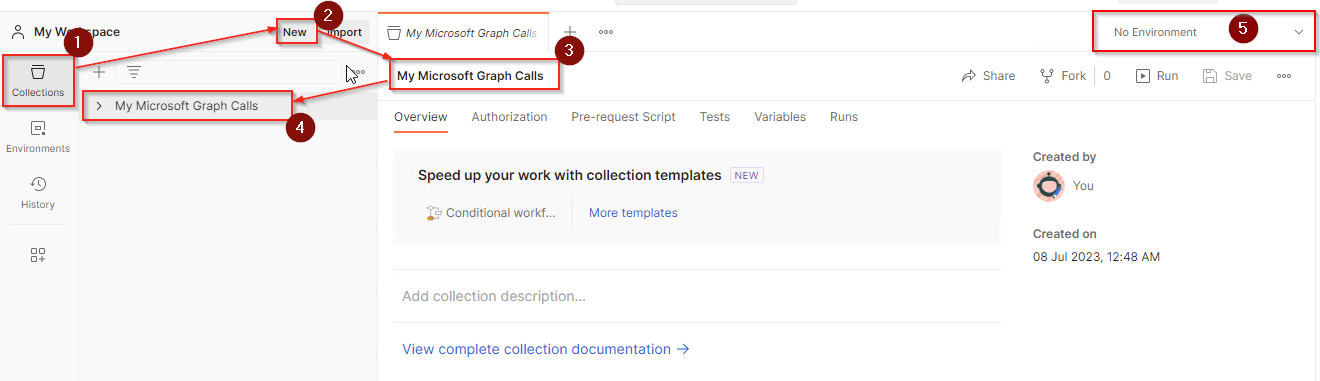
- From the let hand side menu, click on Collections.
- Click New (you may be asked what you want to create, if asked select Collection).
- Give it a Name
- You can see your collection in this middle section, take note if you ever create new collections. I normally create a collection for each API I am accessing. Whether that be Weather Data, Covid Data, Football data or indeed , Microsoft Graph data.
- After its created, be sure to set your environment here.
The first thing we are going to do is a POST call to login.microsoft.com, this is in order to obtain an access (bearer) token to authenticate against the graph with. The Token will come from the app registration, so whatever permissions the app registration has, thats the permissions the bearer token will have. Bear that in mind because with each new permission you add, you will need to POST for a token.
It requires a few things to be set up. From the collection you made, click on the “+” symbol to create a new API call.

Set it up as follows:

- Opt for a POST, this is because we’re going to POST the request to get our bearer Token.
- Fill out the URL as specified here, notice the {{TenantID}} this is going to be populated by the TenantID specified in our Environment.
- Select Body.
- Select x-www-form-urlencoded.
- Fill out the Body properties exactly as they are on the Image. Notice where we are using properties specified from the environment, this allow us to create multiple environments, if we manage multiple Intune tenants.
- Save as Get-BearerToken which follows a PowerShell naming convention of verb-noun, but keeps it clean to look at.
- You can select your chosen environment here. When selected, this will POST an API call to the URL to obtain a bearer token from the selected environment (tenant).
As long as you have your environment set, once you hit Send this should return you a bearer token.
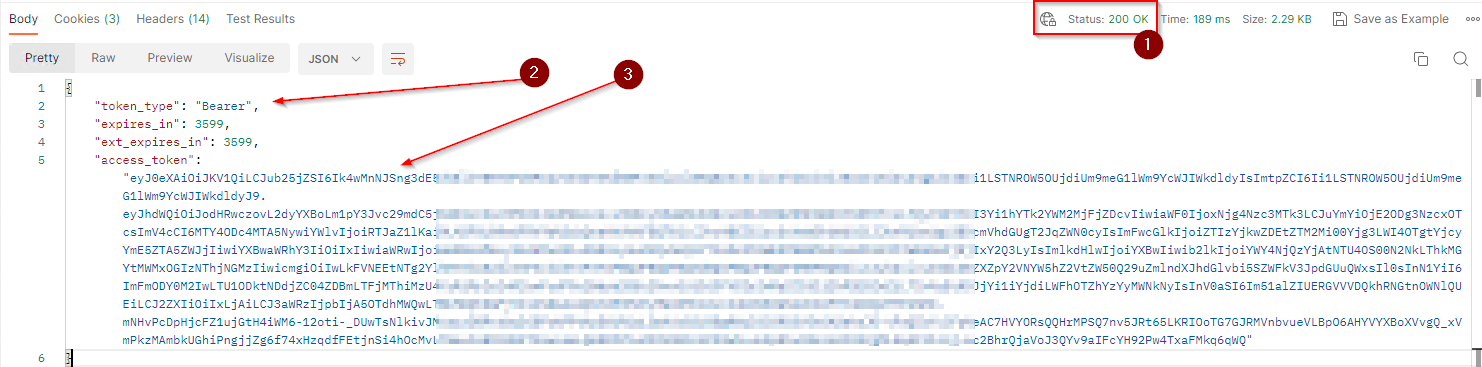
- Notice the status of the call was 200 OK, so all good.
- Its a token type of Bearer.
- The token value.
We’re going to use this bearer token to authenticate against other graph calls we call.
In order to do that we need to put some tests on the call and tell it to set a variable if a value exists.
Info
Let me caveat the following by saying I am in no way a Java script guy and I would love some input on how I can improve this, but it works so I’m going to use it.
On your saved POST call, click on tests and paste the following code into the field;
pm.test("Get Access Token", function ()
    {
        var json = JSON.parse(responseBody);
        postman.setEnvironmentVariable("AppAccessToken", json.access_token);
        pm.response.to.have.status(200)
    }
)
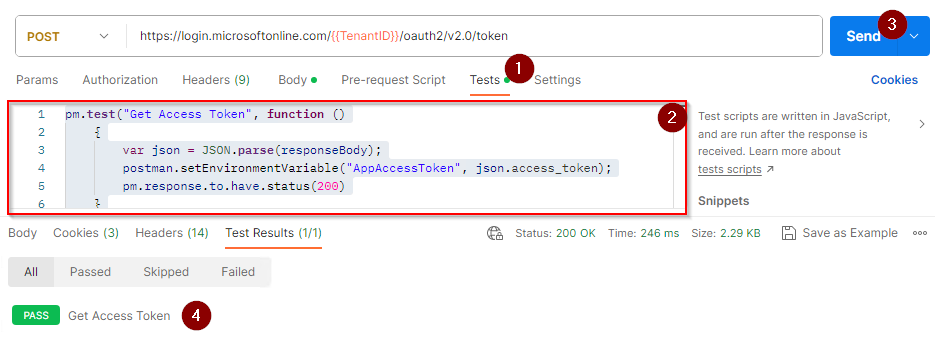
Essentially what this does it sets a new value called AppAccessToken in your current environment. The token will be set until it expires and then you’ll need to post the call again to refresh it. If you do that (POST the call again) after saving the test you should see a Test Pass status in the Test Results.
Tip
Once you add new permissions on the app registration you must refresh the access token so that the new permissions are then applied to the token you are using.
You may notice this sets the current value rather than the initial value, we don’t really want the token syncing to the cloud so this is perfectly fine.
Lets use the /users resource from earlier in this post for our first GET call. So in our collection we set up a new call. I prefer to create a folder for each type of call I am making to separate them out.
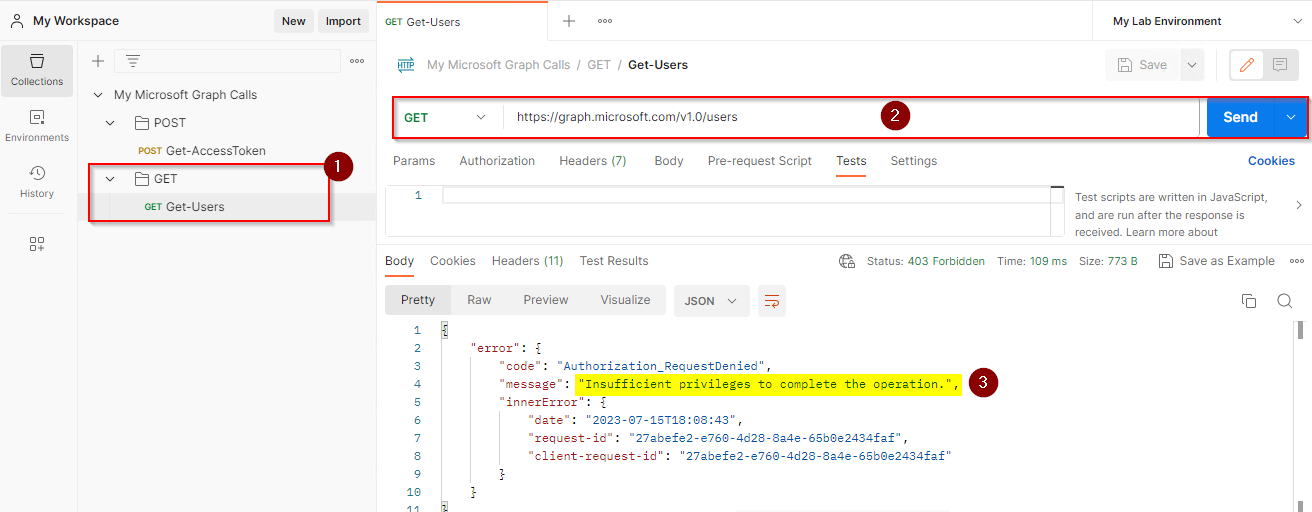
- Here you can see the folders and how I’ve separated the calls out.
- Here you can see how I’ve structured the call.
- Here you can see the results, in this particular case it failed. So I added permissions and got results with a second call. I do like that PostMan gives you feedback in this manner just like the graph explorer. Makes troubleshooting much easier.
Final Note
Using Graph Exporer we can become familiar with the structure of graph calls and the concept of adding permissions. Using Graph Xray we can explore the consoles and extract the graph url for the data the console is visualising for us. Using Postman, you can build up a list of API calls of your own, see the results and troubleshoot permissions. You can examine the results to get an idea of the data you require for your PowerBI reports. Now we have a brilliant discovery toolset to poke around with Microsoft Graph and check results of the call in the response data and as we work through our journey pulling this into PowerBI I will prompt you to save the calls into Postman.
Next up in Part 4 we will first look at creating a function to obtain a Bearer token. We need that token to pull in data from PowerBI using the Microsoft Graph, as that is our authentication method.
I appreciate you taking the time to read my blog.Please give it a share for me.
Jonathan
Links and References
| Location | Link |
|---|---|
| Microsoft Learn | Microsoft Graph REST API beta endpoint reference |
| Microsoft Learn | Microsoft Graph REST API v1.0 endpoint reference |
| Microsoft Graph | Microsoft Graph Explorer |
| Microsoft Learn | OData : Query options overview |
| Edge Add-Ons | Graph X-Ray |
| PostMan | Postman App |
| SCCMentor | Paul Winstanley - Automating Windows 365 Part 2 – Using Graph XRay |